Developer’s Guide
This guide is targeted to people that want to write new features or fix bugs in rmlint.
Bugs
Please use the issue tracker to post and discuss bugs and features:
Philosophy
We try to adhere to some principles when adding features:
Try to stay compatible to standard unix’ tools and ideas.
Try to stay out of the users way and never be interactive.
Try to make scripting as easy as possible.
Never make
rmlintmodify the filesystem itself, only produce output to let the user easily do it.
Also keep this in mind, if you want to make a feature request.
Making contributions
The code is hosted on GitHub, therefore our preferred way of receiving patches is using GitHub’s pull requests (normal git pull requests are okay too of course).
Note
origin/master should always contain working software. Base your patches
and pull requests always on origin/develop.
Here’s a short step-by-step:
Create a branch from develop. (
git checkout develop && git checkout -b my_feature)Commit your changes. (
git commit -am "Fixed it all.")Check if your commit message is good. (If not:
git commit --amend)Push to the branch (
git push origin my_feature)Open a Pull Request against the develop branch.
Enjoy a refreshing Tea and wait until we get back to you.
Here are some other things to check before submitting your contribution:
Does your code look alien to the other code? Is the style the same? You can run this command to make sure it is the same:
$ clang-format -style=file -i $(find lib src -iname '*.[ch]')
Do all tests run? Go to the test documentation for more info. Also after opening the pull request, your code will be checked via TravisCI.
Is your commit message descriptive? whatthecommit.com has some good examples how they should not look like.
Is
rmlintrunning okay inside ofvalgrind(i.e. no leaks and no memory violations)?
For language-translations/updates it is also okay to send the .po files via
mail at sahib@online.de, since not every translator is necessarily a
software developer.
Testsuite
rmlint has a not yet complete but quite powerful testsuite. It is not
complete yet (and probably never will), but it’s already a valuable boost of
confidence in rmlint's correctness.
The tests are based on pytest and are written in python>=3.0.
Every testcase just runs the (previously built) rmlint binary a
and parses its json output. So they are technically blackbox-tests.
On every commit, those tests are additionally run on TravisCI.
Control Variables
The behaviour of the testsuite can be controlled by certain environment variables which are:
RM_TS_DIR: Testdir to create files in. Can be very large with some tests, sometimestmpfsmight therefore slow down your computer. By default/tmpwill be used.RM_TS_USE_VALGRIND: Run each test inside of valgrind’s memcheck. (slow)RM_TS_CHECK_LEAKS: Fail test if valgrind indicates (definite) memory leak.RM_TS_USE_GDB: Run tests inside ofgdb. Fatal signals will trigger a backtrace.RM_TS_PEDANTIC: Run each test several times with different optimization options and check for errors between the runs. (slow).RM_TS_SLEEP: Waits a long time before executing a command. Useful for starting the testcase and manually runningrmlinton the priorly generated testdir.RM_TS_PRINT_CMD: Print the command that is currently run.RM_TS_KEEP_TESTDIR: If a test failed, keep the test files.
Additionally slow tests can be omitted with by appending -k 'not slow' to
the commandline. More information on this syntax can be found on the pytest
documentation.
Before each release we call the testsuite (at least) like this:
$ sudo RM_TS_USE_VALGRIND=1 RM_TS_PRINT_CMD=1 RM_TS_PEDANTIC=1 pytest -s -a 'not slow and not known_issue'
The sudo here is there for executing some tests that need root access (like
the creating of bad user and group ids). Most tests will work without.
Coverage
To see which functions need more testcases we use gcov to detect which lines
were executed (and how often) by the testsuite. Here’s a short quickstart using
lcov:
$ CFLAGS="-fprofile-arcs -ftest-coverage" LDFLAGS="-fprofile-arcs -ftest-coverage" scons -j4 DEBUG=1
$ sudo RM_TS_USE_VALGRIND=1 RM_TS_PRINT_CMD=1 RM_TS_PEDANTIC=1 pytest -s -a 'slow and not known_issue'
$ lcov --capture --directory . --output-file coverage.info
$ genhtml coverage.info --output-directory out
The coverage results are updated from time to time here:
Structure
tests
├── test_formatters   # Tests for output formatters (like sh or json)
├── test_options      # Tests for normal options like --merge-directories etc.
├── test_types        # Tests for all lint types rmlint can find
└── utils.py          # Common utilities shared among tests.
Templates
A template for a testcase looks like this:
from tests.utils import *

def test_basic(usual_setup_usual_teardown):
    create_file('xxx', 'a')
    create_file('xxx', 'b')

    head, *data, footer = run_rmlint('-a city -S a')

    assert footer['duplicate_sets'] == 1
    assert footer['total_lint_size'] == 3
    assert footer['total_files'] == 2
    assert footer['duplicates'] == 1
Rules
Test should be able to run as normal user.
If that’s not possible, check at the beginning of the testcase with this:
if not runs_as_root():
    return
Regressions in
rmlintshould get their own testcase so they do not appear again.Slow tests can be marked with a slow attribute:
import pytest

@pytest.mark.slow
def test_debian_support(usual_setup_usual_teardown):
    assert random.choice([True, False]):
Unresolved issues can be marked with the
known_issueattribute to avoid failing automated travis testing.
Buildsystem Helpers
Environment Variables
- CFLAGS:
Extra flags passed to the compiler.
- LDFLAGS:
Extra flags passed to the linker.
- CC:
Which compiler to use?
# Use clang and enable profiling, verbose build and enable debugging
CC=clang CFLAGS='-pg' LDFLAGS='-pg' scons VERBOSE=1 DEBUG=1
Variables
- O=<level>:
Set the optimization level.
Valid levels are currently those that may be passed with the GCC/Clang option
-O; these include0,1,2,3,s,fast,g, etc., depending on the compiler version.In addition, the level may be
debugorrelease, which indicates that the optimization level should be whatever the build system currently defines to be the default for the associated build mode.- DEBUG=1:
Enable a debugging build.
This turns on extra tests; in particular, it turns on run-time assertions. By default, a debug build excludes optimizations that may hinder debugging, but this may be overridden with the
Ovariable, as usual.Note that setting
DEBUG=1does not enable the production of debugger symbols; to enable those, useSYMBOLS=1orGDB=1.This should always be enabled during development.
- SYMBOLS=1:
Enable debugger symbols.
This option instructs the compiler to collect information that will help tools such as
gdbpresent human-readable identifiers for a program’s functions and variables, etc. Note, though, that this information becomes obscured by optimizations, so make sure to set the optimization level appropriately.- GDB=1:
Enable options that help a debugger (such as
gdb).This option is equivalent to
DEBUG=1 SYMBOLS=1.- VERBOSE=1:
Print the exact compiler and linker commands. Useful for troubleshooting build errors.
- CCFLAGS=<command line options>:
Set the last compiler options.
Internally, the build system maintains in
CCFLAGSthe list of options that are supplied to the compiler; this list is composed by combining the relevant environment variables (such asCFLAGS) along with the choices made by other build-time configurations.This command-line variable makes it possible to override an option in this list by supplying customized command-line options to be appended. For example:
GDB=1 CCFLAGS=-g1.The string that is supplied as the value for this variable is parsed as per a POSIX shell command line, and so it may include shell quoting if necessary.
Arguments
- –prefix:
Change the installation prefix. By default this is
/usr, but some users might prefer/usr/localor/opt.- –actual-prefix:
This is mainly useful for packagers. The
rmlintbinary knows where it is installed (which is needed to set e.g. the path to the gettext files). When installing a package, most of the time the build is installed to a local test environment first before being packed to/usr. In this case the--prefixwould be set to the path of the temporary build env, while--actual-prefixwould be set to/usr.- –libdir:
Some distributions like Fedora use separate libdirectories for 64/32 bit. If this happens, you should set the correct one for 64 bit with
--libdir=lib64.- –without-libelf:
Do not link with
libelf, which is needed for nonstripped binary detection.- –without-blkid:
Do not link with
libblkid, which is needed to differentiate between normal rotational harddisks and non-rotational disks.- –without-json-glib:
Do not link with
libjson-glib, which is needed to load json-cache files. Without this library a warning is printed when using--replay.- –without-fiemap:
Do not attempt to use the
FIEMAP ioctl(2).- –without-gettext:
Do not link with
libintland do not compile any message catalogs.- –without-gui:
Do not install
shredder(GUI).- –without-compile-glib-schemas:
Do not (re)compile system Glib schemas on installation/uninstallation.
All --without-* options come with a --with-* option that inverses its
effect. By default rmlint is built with all features available on the
system, so you do not need to specify any --with-* option normally.
Notable targets
- install:
Install all program parts system-wide.
- config:
Print a summary of all features that will be compiled and what the environment looks like.
- man:
Build the manpage.
- docs:
Build the online html docs (which you are reading now).
- test:
Build the tests (requires
pythonandpytestinstalled). Optionallyvalgrindcan be installed to run the tests through valgrind:$ USE_VALGRIND=1 pytest
- xgettext:
Extract a gettext
.pottemplate from the source.- dist:
Build a tarball suitable for release. Save it under
rmlint-$major-$minor-$patch.tar.gz.- release:
Same as
dist, but reads the.versionfile and replaces the current version in the files that are not built by scons.
Sourcecode layout
All C-source lives in
lib, the file names should be self explanatory.As an exception, the main lives in
src/rmlint.c.All documentation is inside
docs.All translation stuff should go to
po.All packaging should be done in
pkg/<distribution>.Tests are written in Python and live in
tests.
Hashfunctions
Here is a short comparison of the existing hashfunctions in rmlint (linear scale).
For reference: Those plots were rendered with these sources - which are very ugly, sorry.
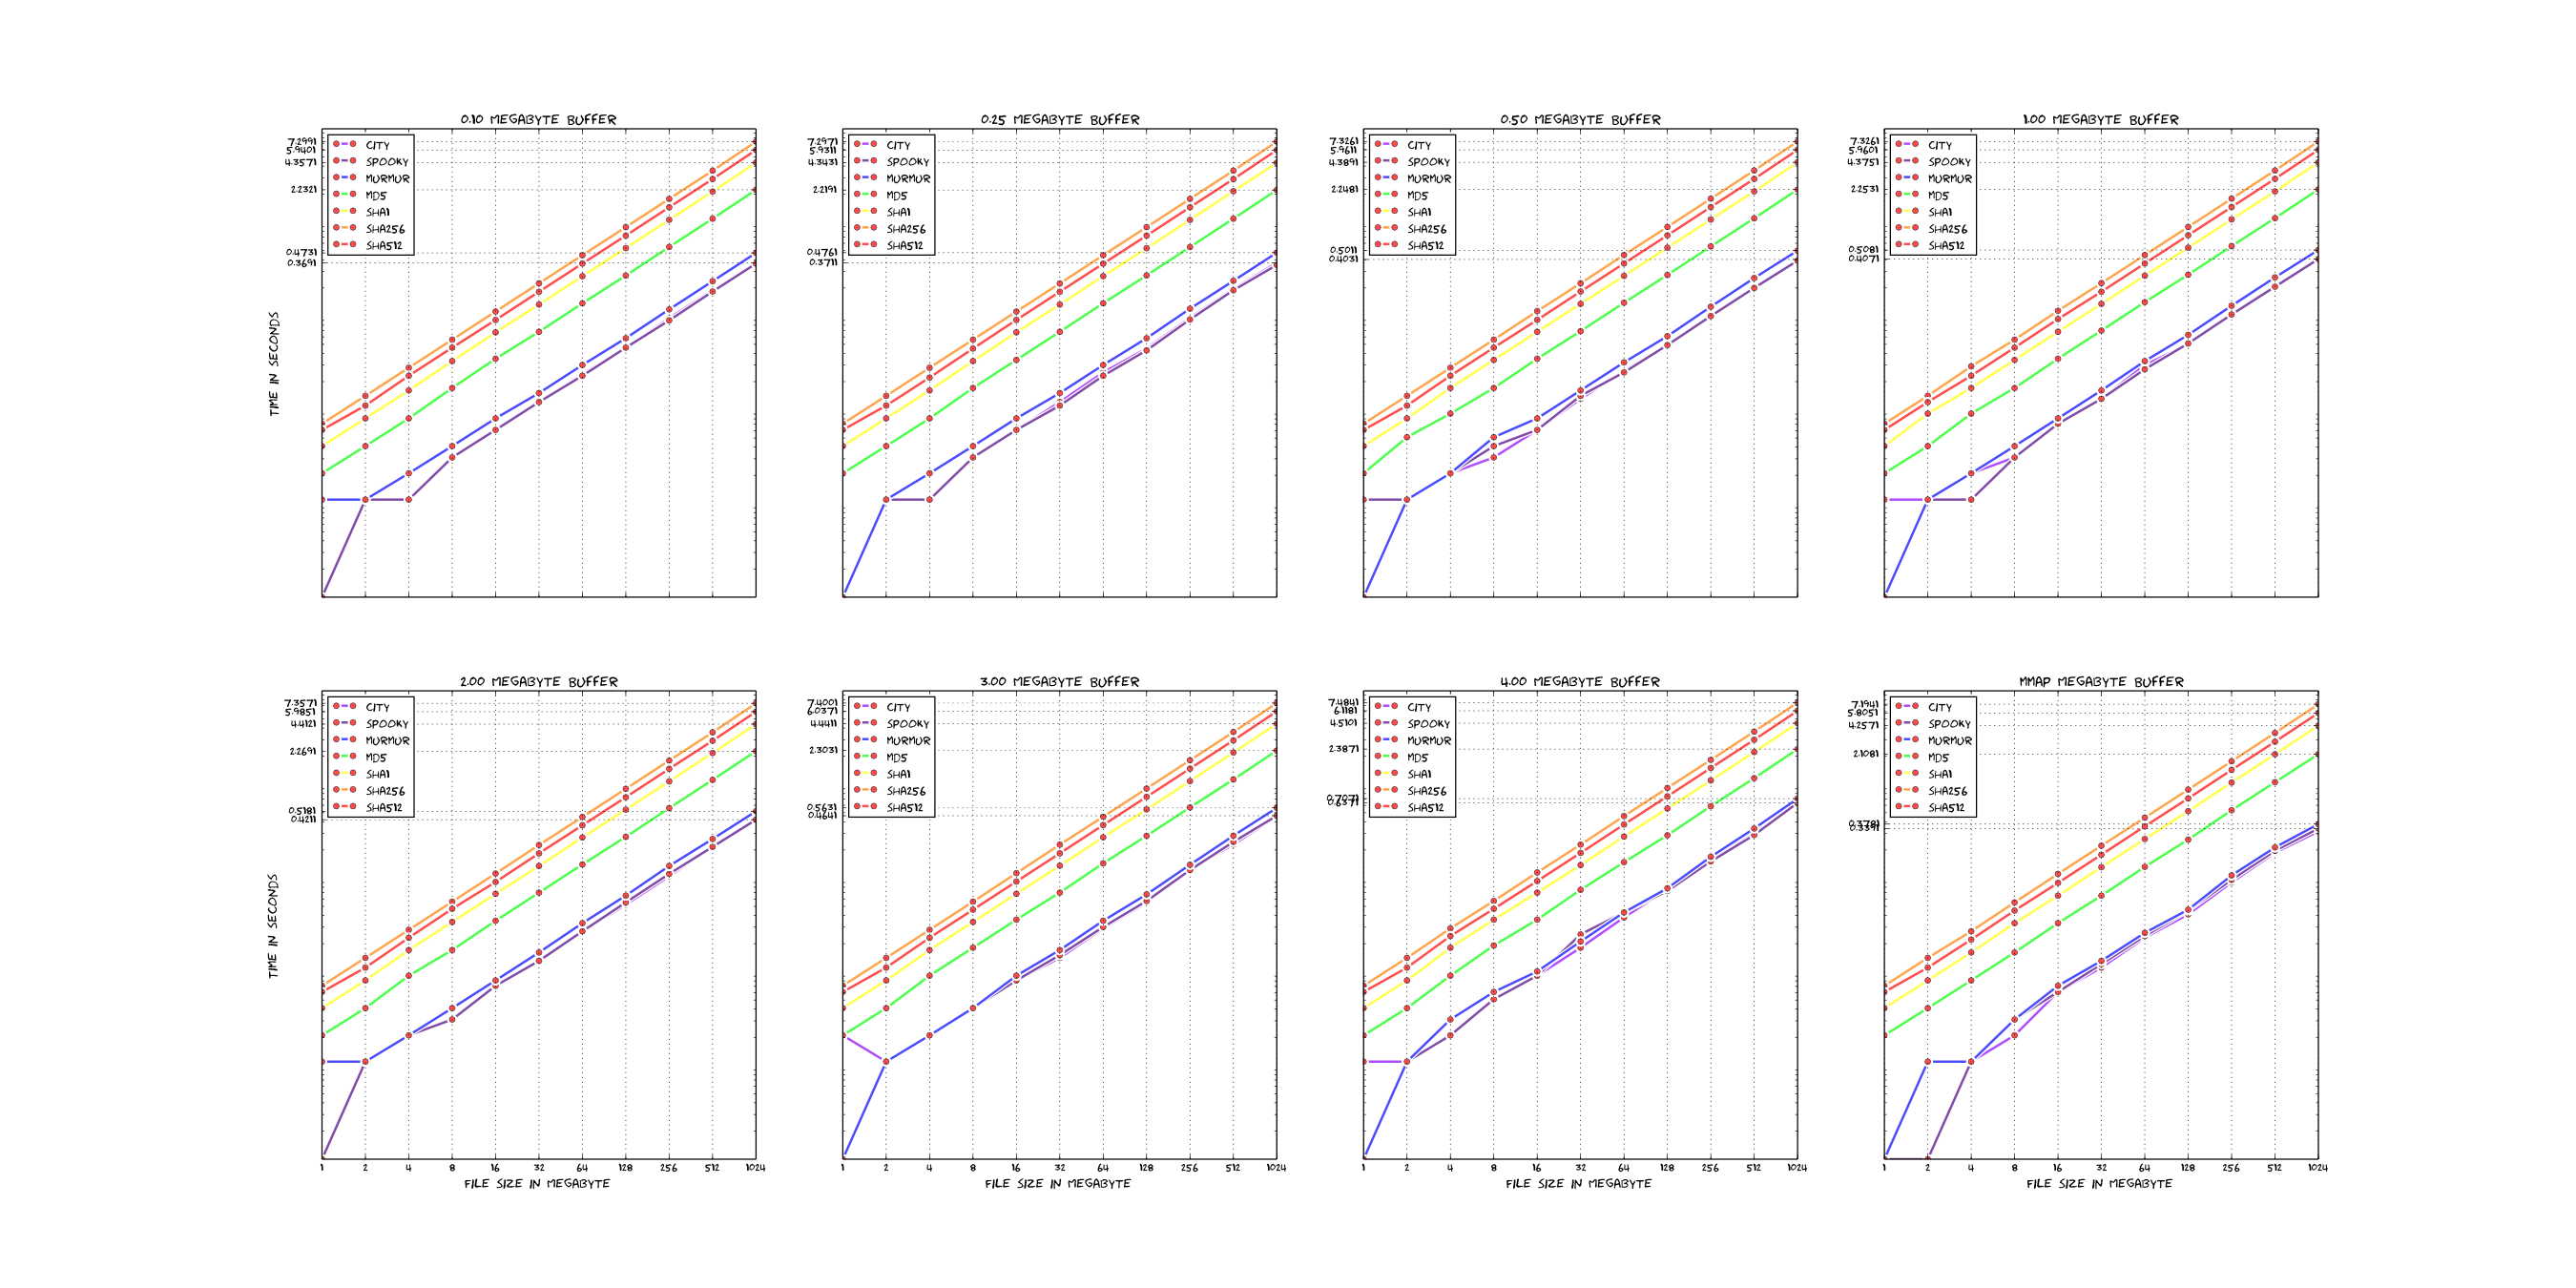
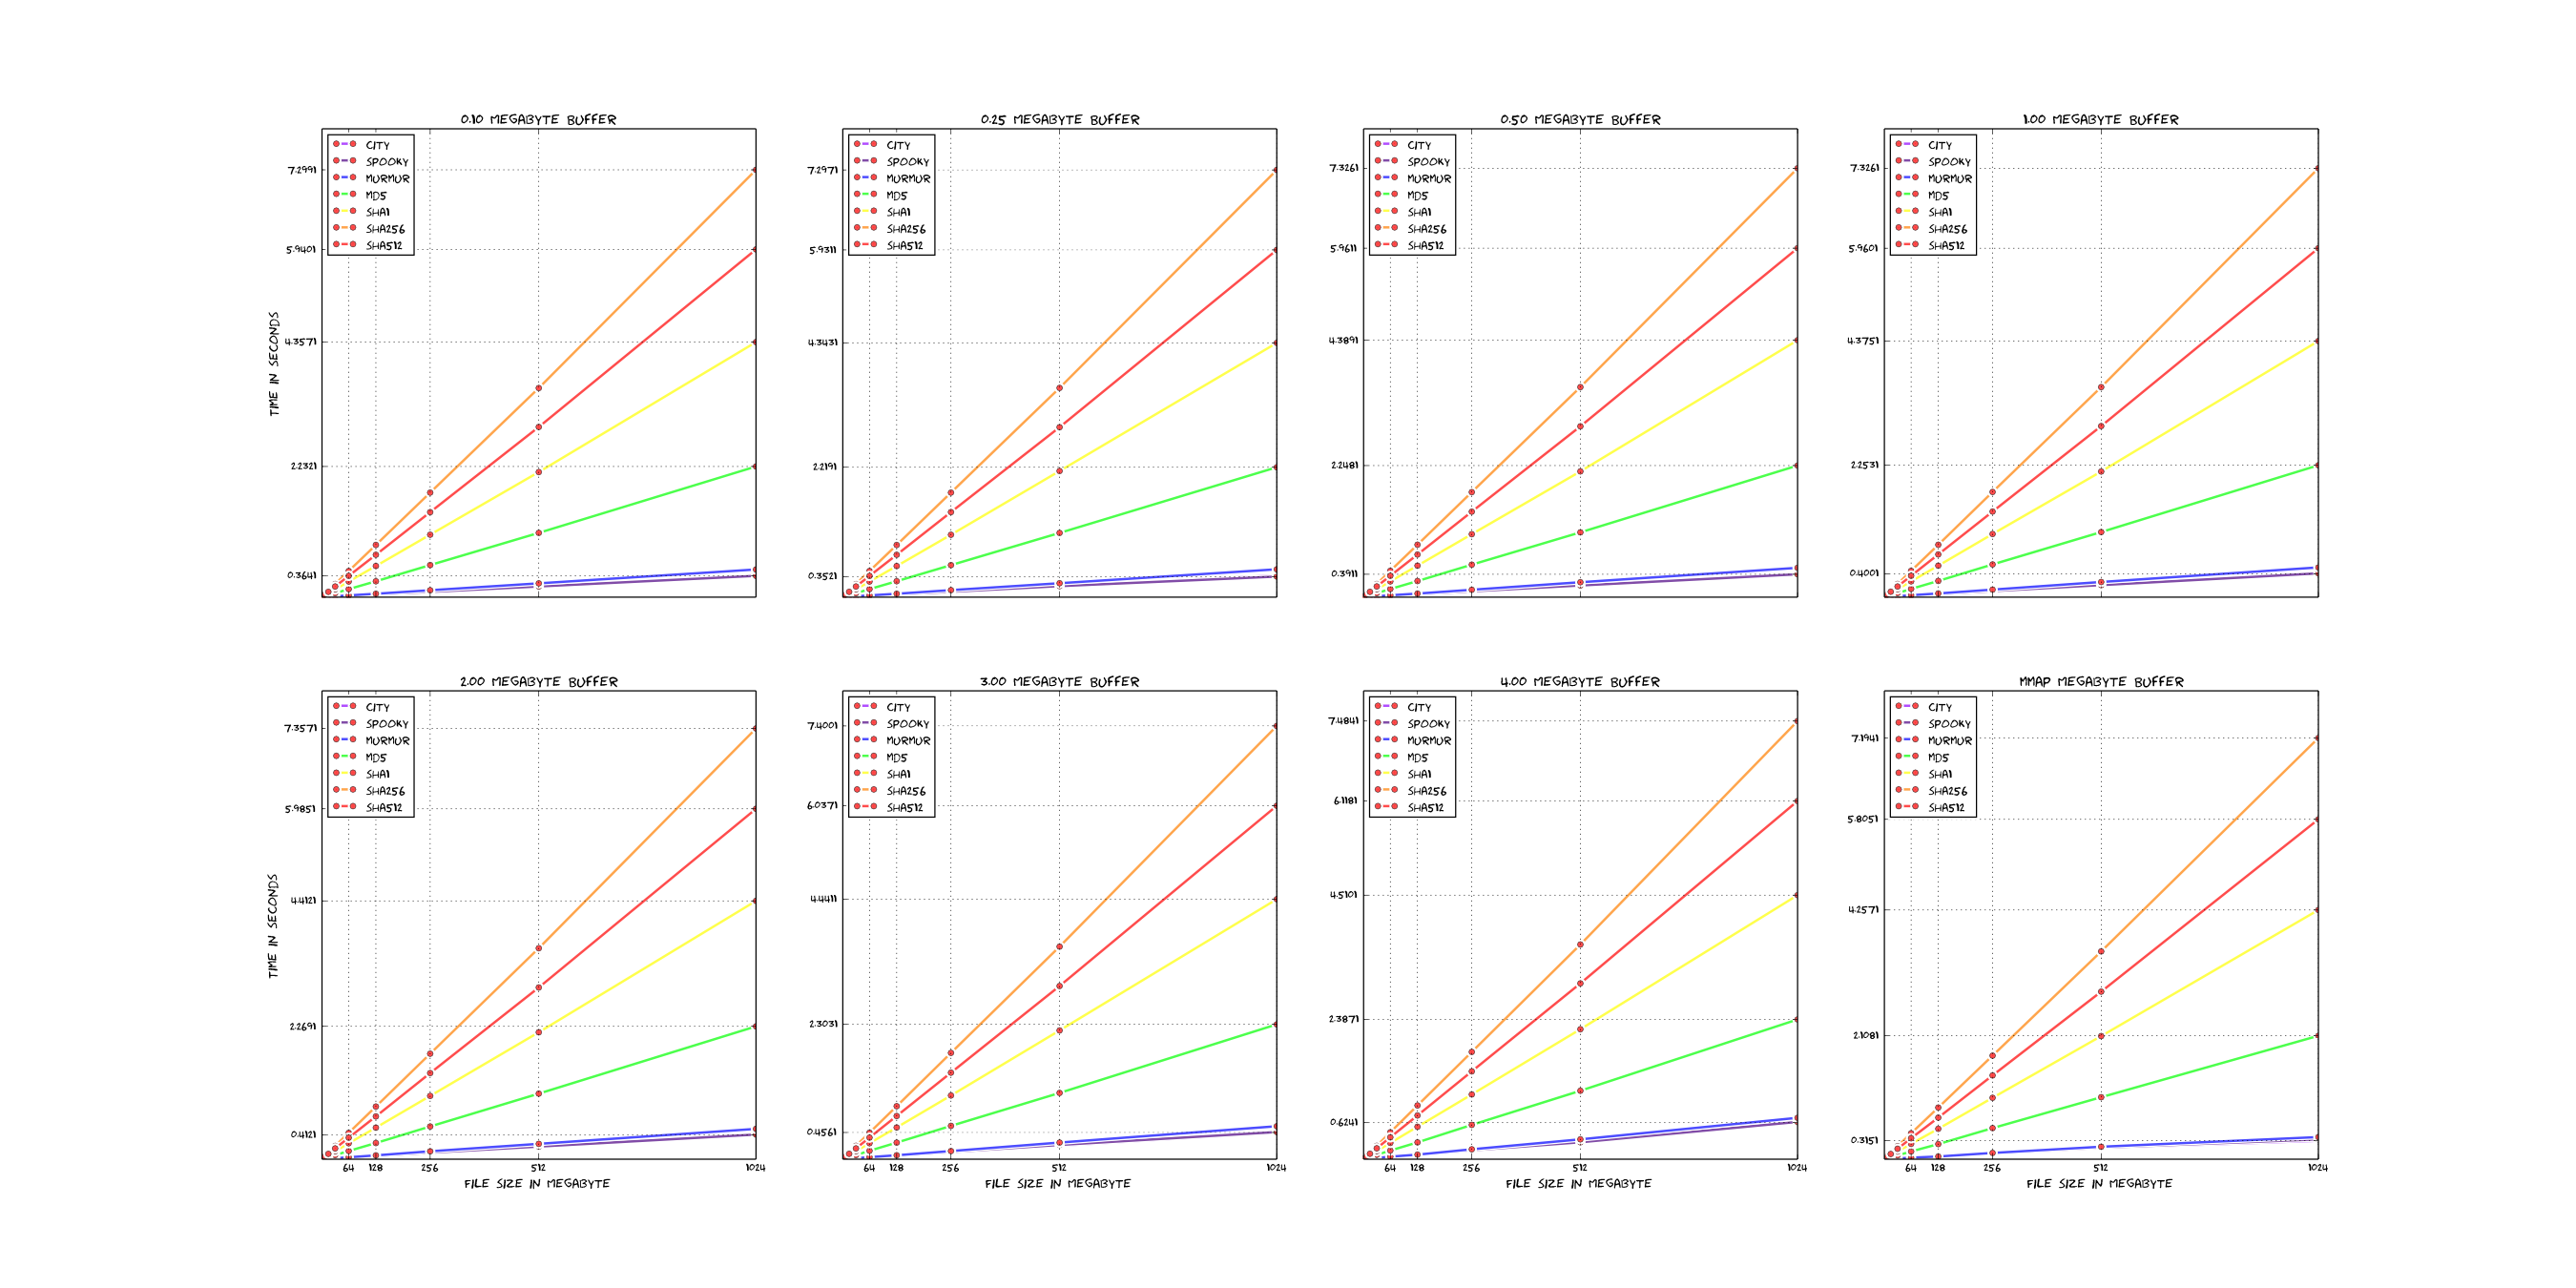
If you want to add new hashfunctions, you should have some arguments why it is valuable and possibly even benchmark it with the above scripts to see if it’s really that much faster.
Also keep in mind that most of the time the hashfunction is not the bottleneck.
Optimizations
For sake of overview, here is a short list of optimizations implemented in rmlint:
Obvious ones
Do not compare each file with each other by content, use a hashfunction to reduce comparison overhead drastically (introduces possibility of collisions though).
Only compare files of same size with each other.
Use incremental hashing, i.e. hash block-wise each size group and stop as soon a difference occurs or the file is read fully.
Create one reading thread for each physical disk. This gives a big speedup if files are roughly evenly spread over multiple physical disks [note: currently using 2 reading threads per disk as a workaround for a speed regression but hoping to fix this for rmlint 2.5].
Disk traversal is similarly multi-threaded, one thread per disk.
Create separate hashing threads (one for each file) so that the reader threads don’t have to wait for hashing to catch up.
Subtle ones
Check only executable files to be non-stripped binaries.
Use
preadv(2)based reading for small speeedups.Every thread in rmlint is shared, so only few calls to
pthread_createare made.
Insane ones
Use
fiemap ioctl(2)to analyze the harddisk layout of each file, so each block can read it in perfect order on a rotational device.Check the device ID of each file to see if it on a rotational (normal hard disks) or on a non-rotational device (like an SSD). On the latter the fiemap optimisation is bypassed.
Use a common buffer pool for IO buffers and recycle used buffers to reduce memory allocation overheads.
Use only one hashsum per group of same-sized files.
Implement paranoia check using the same algorithm as the incremental hash. The difference is that large chunks of the file are read and kept in memory instead of just keeping the hash in memory. This avoids the need for a two-pass algorithm (find matches using hashes then confirm via bytewise comparison). Each file is read once only. This achieves bytewise comparison in O(N) time, even if there are large clusters of same-size files. The downside is that it is somewhat memory-intensive (can be configured by
--limit-memoption).